


Unlock Data Insights: Master Google Forms in Minutes!


The digital age demands efficient data collection. Whether you’re a small business owner gauging customer satisfaction, a teacher creating a quiz, or a researcher gathering survey responses, the ability to quickly and easily create forms is invaluable. But navigating the vast landscape of online tools can be daunting. Many people, particularly in areas like the struggling artisan community of Bantul, Yogyakarta, find themselves overwhelmed by complex software and expensive subscriptions. They need a simple, accessible solution that empowers them to collect crucial information without breaking the bank. This is where Google Forms steps in, offering a free, user-friendly platform for creating surveys, quizzes, and more.
This article will guide you through the process of creating a Google Form, from the initial setup to customizing its appearance and sharing it with your target audience. We’ll explore key features and functionalities, offering practical tips and insights to help you master this powerful tool. By the end, you’ll be equipped to create professional-looking forms that streamline your data collection efforts. Let’s dive in and unlock the potential of Google Forms! The digital transformation is a journey that many people are still taking, and this guide will help you create a form for the first time or maybe learn some new tips and tricks. Google Forms is a simple and effective solution to collect data and improve your user experience.
We will cover the steps of creating a new Google Form, customizing the theme, adding different question types, setting up response validation, and sharing the form with your intended audience. Whether you’re a student, a teacher, a business owner, or anyone else who needs to collect data, this guide will help you get started with Google Forms. The steps in this article are very easy to follow, and this article will also include some tips and tricks to help you make the most of this powerful tool.
1. Initiating Your Form: Accessing and Creating a New Google Form
The first step to harnessing the power of Google Forms is, of course, accessing it. Luckily, this is a breeze if you already have a Google account (which most people do!). Simply navigate to Google Drive. You can do this by going to drive.google.com in your web browser. Once you’re in Google Drive, click on the "+ New" button located in the upper left corner of the screen. A dropdown menu will appear. Hover over "More," and then select "Google Forms" from the extended list. This action will open a brand new, untitled Google Form ready for your creative input.
Alternatively, you can go directly to forms.google.com. This will also open a new, untitled Google Form. Choose whichever method is most convenient for you. This is the beginning of your journey to become a Google Forms expert.
Now, you’re staring at a blank canvas – a form waiting to be brought to life. The first thing you’ll want to do is give your form a title. Click on "Untitled Form" at the top left of the page and type in a descriptive title. This will help you easily identify your form later, especially if you plan to create multiple forms. For example, if you’re conducting a customer satisfaction survey for your coffee shop in Malang, you might name it "Malang Coffee Shop Customer Satisfaction Survey." Similarly, give your form a description. Click on the "Form description" field below the title and provide a brief overview of the form’s purpose. This will give your respondents context and encourage them to participate.
2. Designing the User Experience: Customizing the Theme and Appearance
A visually appealing form is more likely to capture attention and encourage participation. Google Forms offers a range of customization options to help you create a form that reflects your brand or personal style. To access these options, click on the "Customize theme" button located at the top right of the page (it looks like a paint palette).
This will open a sidebar with various customization options. You can choose a header image to add visual interest to the top of your form. Google Forms provides a library of pre-designed images, or you can upload your own. Consider using an image that is relevant to the topic of your form. Next, you can select a theme color to match your brand or personal preferences. The theme color will be applied to the header and other elements of the form. You can also choose a background color to further customize the appearance of your form.
"We started using Google Forms to collect feedback on our batik designs," says Ibu Ani, a batik artisan in Yogyakarta. "The ability to add a header image showcasing our batik made the form feel more personal and engaging, and we saw a significant increase in response rates."
Finally, you can choose a font style to further personalize your form. Google Forms offers a limited selection of fonts, so choose one that is easy to read and complements the overall design of your form. The key is to create a form that is visually appealing and easy to navigate, encouraging respondents to complete it.
3. Building the Core: Adding and Configuring Different Question Types
The heart of any Google Form lies in its questions. Google Forms offers a variety of question types to suit different data collection needs. To add a question, click on the "+" button in the floating toolbar. A new question will be added to your form.
Click on the question title to enter your question text. Then, click on the dropdown menu next to the question to select the question type. Here are some of the most common question types:
- Short answer: For collecting brief text responses, such as names or email addresses.
- Paragraph: For collecting longer, more detailed text responses.
- Multiple choice: For presenting respondents with a list of options, where they can select only one.
- Checkboxes: For presenting respondents with a list of options, where they can select multiple.
- Dropdown: Similar to multiple choice, but presented in a dropdown menu.
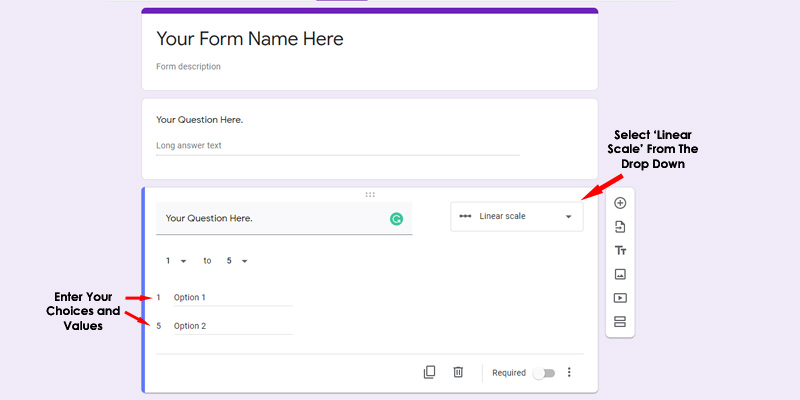
- Linear scale: For rating something on a scale, such as from 1 to 5.
- Multiple choice grid: For creating a grid of multiple choice questions.
- Checkbox grid: For creating a grid of checkbox questions.
- Date: For collecting dates.
- Time: For collecting times.
For each question, you can choose to make it required by toggling the "Required" switch. Required questions must be answered before the form can be submitted. "In our surveys about organic farming practices in Boyolali, we always make the ‘yield per hectare’ question required," explains Pak Budi, a local agricultural extension worker. "This ensures we get the most crucial data for our analysis."
Each question type has its own unique settings. For example, for multiple choice questions, you can add options, shuffle the option order, and add an "Other" option. Explore the different settings for each question type to customize them to your specific needs.
4. Ensuring Quality Data: Setting Up Response Validation
Collecting accurate and reliable data is crucial for making informed decisions. Google Forms offers response validation options to help you ensure that respondents provide valid answers. To set up response validation, click on the three vertical dots (more options) at the bottom right of a question. Then, select "Response validation."
The available validation options vary depending on the question type. For example, for short answer questions, you can validate the length of the response, requiring it to be a certain number of characters or words. You can also use regular expressions to validate the format of the response, such as ensuring that it is a valid email address. For number questions, you can validate that the response is a number within a certain range.
If a respondent enters an invalid response, they will see an error message. You can customize the error message to provide clear instructions on how to correct the response. "We use response validation extensively when collecting data on the amount of waste recycled in our neighborhood in Surabaya," says a member of the local recycling initiative. "It ensures that people enter realistic numbers, preventing skewed data."
By setting up response validation, you can significantly improve the quality of the data you collect.
5. Reaching Your Audience: Sharing Your Google Form
Once you’ve created and customized your Google Form, it’s time to share it with your target audience. Click on the "Send" button at the top right of the page. A window will pop up with various sharing options.
You can send the form via email by entering the email addresses of your recipients. You can also get a shareable link to the form, which you can then paste into an email, social media post, or website. You can also embed the form directly into your website by copying the embed code.
Before sharing your form, consider shortening the URL. Google Forms automatically generates long URLs, which can be cumbersome to share. Click on the "Shorten URL" checkbox to generate a shorter, more manageable URL. In order to make sure your form gets to your audience, consider using multiple distribution methods.
"We found that sharing our Google Form on our Facebook group and through our local WhatsApp group in Denpasar resulted in the highest response rate," shares a community organizer. "Different audiences respond to different channels."
Choose the sharing method that is most appropriate for your target audience. After sending the form, make sure to monitor the responses. Google Forms automatically collects and organizes the responses in a spreadsheet, which you can access from the "Responses" tab.
Conclusion: Empowering Data Collection with Google Forms
Google Forms is a powerful and versatile tool for collecting data. From simple surveys to complex quizzes, it offers a wide range of features and functionalities to suit different needs. By following the steps outlined in this article, you can quickly and easily create professional-looking forms that streamline your data collection efforts.
Remember to focus on creating a user-friendly experience, customizing the appearance of your form to match your brand or personal style, and setting up response validation to ensure the quality of your data. We can all start by using Google Forms to collect feedback on community initiatives, student learning, or customer satisfaction.
Hopefully, this guide has inspired other regions to adopt similar approaches to data collection, empowering them to make informed decisions and drive positive change. The digital world is here, and we are all on our journey to find the best ways to navigate it and use it to our advantage.


