OpenVPN connect private key: Sounds techy, right? But mastering this unlocks a world of secure online access. Think of your private key as your digital passport to a secure VPN server, granting you encrypted access to the internet. This guide unravels the mysteries of private keys, from understanding their function and formats to securely managing them and troubleshooting common connection hiccups. Get ready to ditch the public Wi-Fi worries and embrace secure browsing!
We’ll cover everything from generating and managing your key using OpenSSL to understanding the security implications of a compromised key. We’ll even walk you through connecting to your OpenVPN server step-by-step, comparing different client applications along the way. Whether you’re a seasoned tech pro or a curious newbie, this guide’s got you covered.
Understanding OpenVPN Private Keys
So, you’ve got your OpenVPN setup almost ready to go. But what about that mysterious private key? It’s the unsung hero of your secure connection, and understanding it is crucial for maintaining your online privacy. Think of it as the key to your digital fortress – lose it, and your fortress is vulnerable.
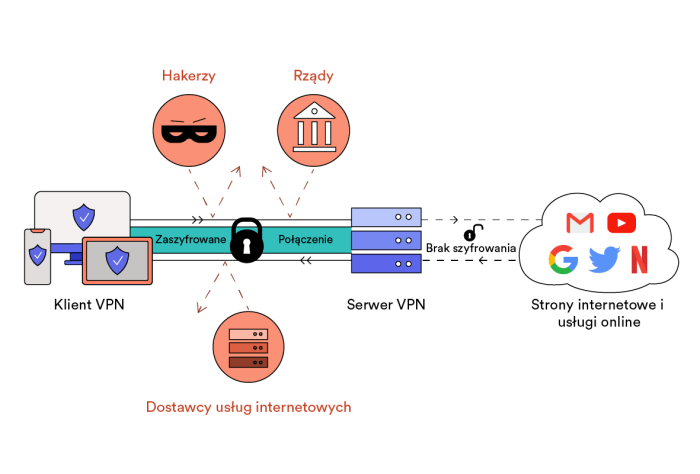
OpenVPN private keys are cryptographic keys that authenticate your OpenVPN client to the server. They prove your identity to the server, allowing you to establish a secure, encrypted connection. Without the correct private key, your client can’t connect to the VPN server, no matter what. This is fundamental to the security of the entire system.
Private Key Formats
OpenVPN supports various private key formats, each with its own strengths and weaknesses. The most common format is the Privacy-Enhanced Mail (PEM) format, which is a widely used standard for encoding cryptographic keys. Other formats exist, but PEM is the industry standard for OpenVPN. The choice of format often depends on the method used to generate the key and the specific OpenVPN configuration.
Common Private Key File Extensions
You’ll usually find OpenVPN private keys with the file extension `.key` or `.pem`. While both often contain the same data (usually PEM-encoded), the `.pem` extension more explicitly indicates the use of the Privacy-Enhanced Mail encoding. Seeing a file named `client1.key` or `myvpn.pem` should tip you off that you’re dealing with a private key. Remember, though, that the file extension alone isn’t a guarantee; always double-check the file’s contents.
Secure Storage and Management of Private Keys
This is where things get serious. Your private key is like the combination to your safe – losing it means losing access to your secure connection, and potentially exposing your data. Therefore, securing your private key is paramount. Never share it with anyone, and never store it in easily accessible locations like your desktop.
Never share your private key with anyone. Treat it like your most valuable password.
Consider using a dedicated password manager that supports secure key storage. Alternatively, store the key on a hardware security module (HSM) or an encrypted USB drive. Regularly backing up your key to a secure, offline location is also vital, just in case your primary storage fails. Remember, a lost or compromised private key can render your entire OpenVPN setup useless and leave you vulnerable. Prioritize security above all else.
Connecting to an OpenVPN Server using a Private Key

Source: vpn.group
So, you’ve got your OpenVPN private key – congrats! Now it’s time to actually use it to connect to your VPN server and enjoy the encrypted goodness. This process might seem daunting at first, but it’s really quite straightforward once you understand the basic steps. We’ll break it down for you, step by step, so you can be surfing securely in no time.
Connecting to an OpenVPN server using your private key involves importing the key into your chosen OpenVPN client and then specifying the server address and configuration file. The exact steps will vary slightly depending on the client you’re using, but the core principles remain the same. Think of it like unlocking a super-secure door – your private key is the only key that fits.
Connecting to an OpenVPN Server: A Step-by-Step Guide
Here’s a simple, bullet-point guide to walk you through the process. Remember, always download your configuration files and private key from a trusted source to avoid any security risks. Double-check everything before proceeding!
- Download the necessary files: Obtain the OpenVPN configuration file (.ovpn) and your private key (.key) from your VPN provider. These files will usually be sent to you via email after registration.
- Install an OpenVPN client: Choose an OpenVPN client application (like OpenVPN Connect, Tunnelblick, or Viscosity). Download and install the appropriate version for your operating system.
- Import the configuration file: Open your chosen OpenVPN client. Most clients allow you to import the .ovpn file directly. This file usually contains all the necessary server details.
- Import the private key (if necessary): Some clients automatically detect and use the private key within the .ovpn file. Others might require you to manually import it. The exact method depends on the client (see table below).
- Connect to the server: Once the configuration and key are imported, select the connection profile and click “Connect”. You might be prompted to enter a password or passphrase associated with your private key (if you set one up).
- Verify the connection: After connecting, check your IP address using an online tool to confirm that your connection is routed through the VPN server.
Visual Guide to Connecting to an OpenVPN Server
Imagine a three-panel comic strip. Panel 1: You’re holding your downloaded .ovpn file and private key (.key). Panel 2: You’ve opened your OpenVPN client, imported both files, and the client is showing the server details and connection status as “Ready”. Panel 3: You’ve clicked “Connect,” and the connection status is now “Connected,” with a new IP address displayed, signifying your secure connection.
OpenVPN Client Application Comparison
Different OpenVPN clients handle private key imports in slightly different ways. This table summarizes some popular options.
| Client Application | Key Import Method | Operating Systems | Notes |
|---|---|---|---|
| OpenVPN Connect | Usually automatic within the .ovpn file; manual import may be an option depending on the .ovpn file configuration. | Windows, macOS, Android, iOS | Official client, generally user-friendly. |
| Tunnelblick | Usually requires manual import of the .key file alongside the .ovpn file. | macOS | Popular macOS-specific client. |
| Viscosity | Usually automatic within the .ovpn file; manual import may be an option depending on the .ovpn file configuration. | Windows, macOS | A paid client with a user-friendly interface. |
| NetworkManager (Linux) | Requires configuring a VPN connection via the NetworkManager settings, specifying the .ovpn file and path to the .key file. | Linux | Built-in Linux client, requires more technical knowledge. |
Security Implications of OpenVPN Private Keys: Openvpn Connect Private Key
Your OpenVPN private key is the digital equivalent of your house key. Losing control of it means losing control of your secure connection, potentially exposing your sensitive data to malicious actors. Understanding the security risks associated with these keys is crucial for maintaining your online privacy and security.
Risks Associated with Compromised Private Keys
A compromised OpenVPN private key grants unauthorized access to your VPN connection. This means anyone possessing the key can intercept your internet traffic, potentially accessing your online banking details, emails, passwords, and any other sensitive information transmitted through the VPN. The severity of the breach depends on the data you transmit, but the potential for significant harm is substantial. Imagine a scenario where a hacker gains access to your company’s VPN using a stolen private key – the consequences could be devastating, leading to data breaches, financial losses, and reputational damage. This highlights the critical importance of robust security measures.
Mitigating the Risks of Private Key Exposure
Protecting your OpenVPN private key requires a multi-layered approach. First, store it securely – avoid saving it on easily accessible locations like cloud storage services or unencrypted USB drives. Instead, consider using a dedicated hardware security module (HSM) or a strong password-protected encrypted file system. Regularly updating your OpenVPN client and server software is also crucial, patching any known vulnerabilities that could potentially be exploited to steal your key. Furthermore, employing strong passwords or passphrases for protecting your private key is paramount; avoid easily guessable combinations. Implementing multi-factor authentication (MFA) wherever possible adds another layer of security. This combination of secure storage and proactive security practices minimizes the risk of exposure.
Vulnerabilities Related to Private Key Storage and Management
Several vulnerabilities exist concerning the storage and management of OpenVPN private keys. Poor password practices, such as using weak or easily guessable passwords, significantly increase the risk of unauthorized access. Storing keys on easily accessible devices, such as unencrypted cloud storage or shared network drives, leaves them vulnerable to theft or malicious access. Furthermore, inadequate key rotation practices—failing to regularly update keys—extend the window of vulnerability if a key is compromised. Lack of proper access controls, such as failing to restrict access to the key to only authorized users, is another significant risk factor. Finally, neglecting to update the OpenVPN client and server software leaves your system susceptible to known vulnerabilities that could be exploited to steal your key.
Comparison of Encryption Methods for OpenVPN Private Keys, Openvpn connect private key
OpenVPN private keys are typically encrypted using strong asymmetric cryptography algorithms like RSA or ECC (Elliptic Curve Cryptography). RSA, a widely used algorithm, relies on the difficulty of factoring large numbers. ECC, considered more efficient for comparable security levels, utilizes the mathematical properties of elliptic curves. The choice of encryption algorithm often depends on the OpenVPN server’s configuration and the level of security required. Both RSA and ECC offer strong protection against unauthorized access, but the specific implementation and key length are critical factors determining the overall security. A longer key length generally implies higher security, but it can also affect performance. The selection should balance security requirements with performance considerations.
Generating and Managing OpenVPN Private Keys
Source: top10vpn.com
Securing your OpenVPN connection hinges on the strength and proper management of your private key. Think of it as the master key to your digital castle; lose it, and your security crumbles. Generating a robust key and maintaining its security are crucial steps often overlooked, so let’s dive into the nitty-gritty.
Generating a new OpenVPN private key involves using OpenSSL, a powerful command-line tool. It’s free, open-source, and widely available on most operating systems, making it a reliable choice for this critical task. The process is straightforward but requires careful attention to detail to ensure the generated key is truly secure.
OpenSSL Key Generation Process
To generate a 2048-bit RSA private key (a widely accepted standard for security), you’d use a command like this in your terminal:
openssl genrsa -out private.key 2048
This command instructs OpenSSL to generate a 2048-bit RSA private key and save it to a file named “private.key”. Let’s break down the options:
openssl genrsa: This specifies the OpenSSL command for generating an RSA private key.-out private.key: This option designates the output filename for the generated private key. Choose a descriptive and secure filename, and store it in a protected location.2048: This specifies the key size in bits. A larger key size (like 4096 bits) offers even greater security but takes longer to generate and may impact performance slightly. 2048 bits is generally considered sufficient for most use cases.
After running this command, you’ll have your private key file. Remember, this file is extremely sensitive; treat it like your most valuable possession.
Best Practices for Strong Private Key Generation
Creating a truly secure private key goes beyond just using the basic OpenSSL command. Here are some essential best practices:
- Use a Sufficient Key Size: As mentioned, 2048 bits is a good starting point, but consider 4096 bits for enhanced security, especially for long-term use or high-value data.
- Use a Strong Random Number Generator: OpenSSL typically uses a system’s built-in random number generator. However, for ultimate security, consider using a dedicated hardware security module (HSM) or a more robust entropy source to seed the random number generator, ensuring the key’s unpredictability.
- Protect the Private Key File: Store the private key file in a secure location, ideally encrypted using a strong password. Avoid storing it on cloud services or easily accessible locations.
- Regularly Update Keys: While not strictly required for OpenVPN, periodically generating new keys enhances security and mitigates the risk of compromise over time. Consider a yearly update schedule, adjusting based on your specific security requirements.
Secure Private Key Management Checklist
A well-defined lifecycle management plan is vital for maintaining the security of your OpenVPN private keys. Here’s a checklist to ensure you’re on the right track:
- Generation: Use OpenSSL with appropriate key size and a robust random number generator. Store the key in a secure, password-protected location immediately after generation.
- Storage: Use a strong password manager to store the password for the encrypted key file. Avoid storing the key on easily accessible devices or cloud storage.
- Access Control: Restrict access to the key file and its password to only authorized personnel. Implement strong access controls on your system.
- Regular Audits: Periodically review your key management practices to ensure they align with best practices and address any vulnerabilities.
- Rotation: Establish a key rotation schedule and implement a process for securely generating, deploying, and retiring old keys.
- Disposal: When retiring a key, securely erase it from all systems and storage locations. Use secure deletion tools to overwrite the data multiple times.
Troubleshooting OpenVPN Private Key Connections
Source: conceptdraw.com
Connecting to your VPN using an OpenVPN private key can sometimes feel like navigating a digital labyrinth. While the process is generally straightforward, a few common hiccups can leave you disconnected. This section will equip you with the troubleshooting skills to conquer these challenges and restore your secure connection. We’ll cover the most frequent problems, guiding you through solutions with clear explanations.
Common Connection Errors
OpenVPN connection failures often stem from simple mistakes, such as typos in the configuration file or incorrect key placement. Other times, the issue lies within the server’s configuration or network settings. Here are some typical error messages and their potential causes.
- “Initialization Sequence Completed” but no internet access: This often indicates a problem with the OpenVPN server itself, DNS resolution issues, or incorrect routing within your network configuration. Check the server’s status and your network settings.
- “Could not resolve host”: This means OpenVPN can’t find the server’s address. Verify the server address in your configuration file and ensure your DNS settings are correct.
- “Authentication failed”: This is a classic indication of a problem with your private key or configuration file. Double-check for typos and ensure you’re using the correct key file.
- Various cryptic error messages: OpenVPN sometimes provides less-than-helpful error messages. Check the OpenVPN log file for more detailed information. The log file location depends on your operating system and OpenVPN installation.
Troubleshooting Incorrect Key Formats or Permissions
A frequently overlooked aspect of OpenVPN connection issues is the format and permissions of your private key file. The slightest deviation can prevent successful authentication.
- Incorrect Key Format: OpenVPN typically uses private keys in the PKCS#8 format. If your key is in a different format, you might need to convert it using OpenSSL or a similar tool. This involves commands like
openssl pkcs8 -topk8 -inform PEM -outform PEM -in private.pem -out private.p8(remember to replaceprivate.pemwith your actual key file name). Incorrect key formats will result in authentication failure. - File Permissions: Your private key file needs appropriate permissions to be read only by your user account. Incorrect permissions can prevent OpenVPN from accessing the key. Use your operating system’s file permission tools (e.g.,
chmod 600 private.keyon Linux/macOS) to set the permissions correctly. Too-permissive permissions leave your key vulnerable to unauthorized access.
Verifying Private Key Integrity
Ensuring your private key hasn’t been tampered with is crucial for maintaining secure connections. While visual inspection isn’t sufficient, you can verify its integrity using cryptographic tools.
Unfortunately, there’s no simple visual way to check if a private key is valid or corrupted. The key itself is a complex string of data. However, you can indirectly check its integrity by attempting to connect to the OpenVPN server. A successful connection strongly suggests the key is valid and uncorrupted. If the connection fails, you might need to regenerate the key pair. Also, keep your private key securely stored, and avoid sharing it with anyone.
Troubleshooting Flowchart
This flowchart provides a step-by-step guide to resolving common OpenVPN private key connection problems.
| Step | Action | Result |
|---|---|---|
| 1 | Check OpenVPN Server Status | If down, wait for server to be online. If up, proceed to step 2. |
| 2 | Verify Server Address in Configuration File | Correct any typos. If correct, proceed to step 3. |
| 3 | Check Private Key Permissions (chmod 600 private.key) |
Ensure only your user has read access. If correct, proceed to step 4. |
| 4 | Check Key Format (PKCS#8) and Convert if Necessary | Use OpenSSL to convert if needed. If correct, proceed to step 5. |
| 5 | Examine OpenVPN Log Files for Detailed Errors | Address any specific errors indicated. If still unresolved, seek further assistance. |
Closing Notes
Securing your online presence shouldn’t be a mystery. Mastering OpenVPN and your private key is your first step to a safer digital life. By understanding the nuances of key management, security implications, and troubleshooting techniques, you’re taking control of your online privacy. Remember, a strong, well-managed private key is your digital shield against prying eyes. So, go forth and browse securely!