How I Used OBS for My First Live Streaming
Going live for the first time can feel like stepping onto a stage in front of a massive, unseen audience. The pressure’s on to deliver engaging content, and the technical aspects can seem daunting. For my first live stream, I chose OBS Studio, a powerful yet free and open-source live streaming software. I’d heard whispers of its capabilities, and I was eager to see if it lived up to the hype. My initial concerns revolved around setup, managing multiple scenes, and ensuring a smooth broadcast. This article details my journey, from the initial setup to the post-stream analysis, hopefully making your first live stream a little less intimidating.
My primary goal was to create a compelling Facebook Live experience. Facebook boasts a massive user base, making it a prime platform for reaching a wide audience. However, successfully navigating the technical requirements of a live stream on Facebook is crucial. I needed a reliable tool, and OBS seemed to be the perfect solution for a beginner like myself. The thought of a technical glitch during the broadcast filled me with anxiety, but careful preparation was key to alleviating that fear.
Before diving into the technical details, I invested time in planning my content. What would I talk about? How would I keep my audience engaged? This pre-production phase is just as crucial as the technical setup. A captivating live stream isn’t just about the technology; it’s about the value you bring to your viewers. I planned a dynamic presentation, incorporating visuals and interactive elements to maintain viewer interest throughout the live session. This was my first time using OBS Studio, so this was a huge learning curve for me.

I knew that my Facebook Live stream needed to be high-quality to make a good impression. Poor audio or video quality can quickly turn viewers away. Therefore, I spent considerable time testing my microphone and webcam, ensuring they provided clear and crisp audio and video. A smooth and professional broadcast is essential for building trust and credibility with your audience. The preparation was worth it as I received many positive comments after the stream about the quality.
Learning to use OBS Studio felt like learning a new musical instrument. At first, it seemed overwhelming with all the options and settings. But, once I grasped the fundamental concepts – adding scenes, sources, and transitions – it became much more manageable. The online community surrounding OBS is incredibly helpful, with countless tutorials and guides available. I found many helpful resources online that eased my initial apprehension.
Setting Up OBS for Facebook Live
The first step was configuring OBS to stream to Facebook. This involved creating a Facebook page (if you didn’t already have one), navigating to the "Live Video" settings, and copying the stream key. This key acts as a unique identifier, linking your OBS setup to your Facebook page. I double-checked this several times to avoid any accidental broadcasts to the wrong account. Getting this wrong could have been disastrous. The process was surprisingly straightforward, thanks to Facebook’s clear instructions.
I carefully configured my audio sources, ensuring my microphone was properly selected and the audio levels were balanced. Testing this beforehand was vital; nothing is worse than a live stream with poor audio quality. I also set up my webcam, making sure the framing was flattering and the lighting was adequate. Proper lighting can make a huge difference in the overall quality of your stream. A well-lit face is a happy face.
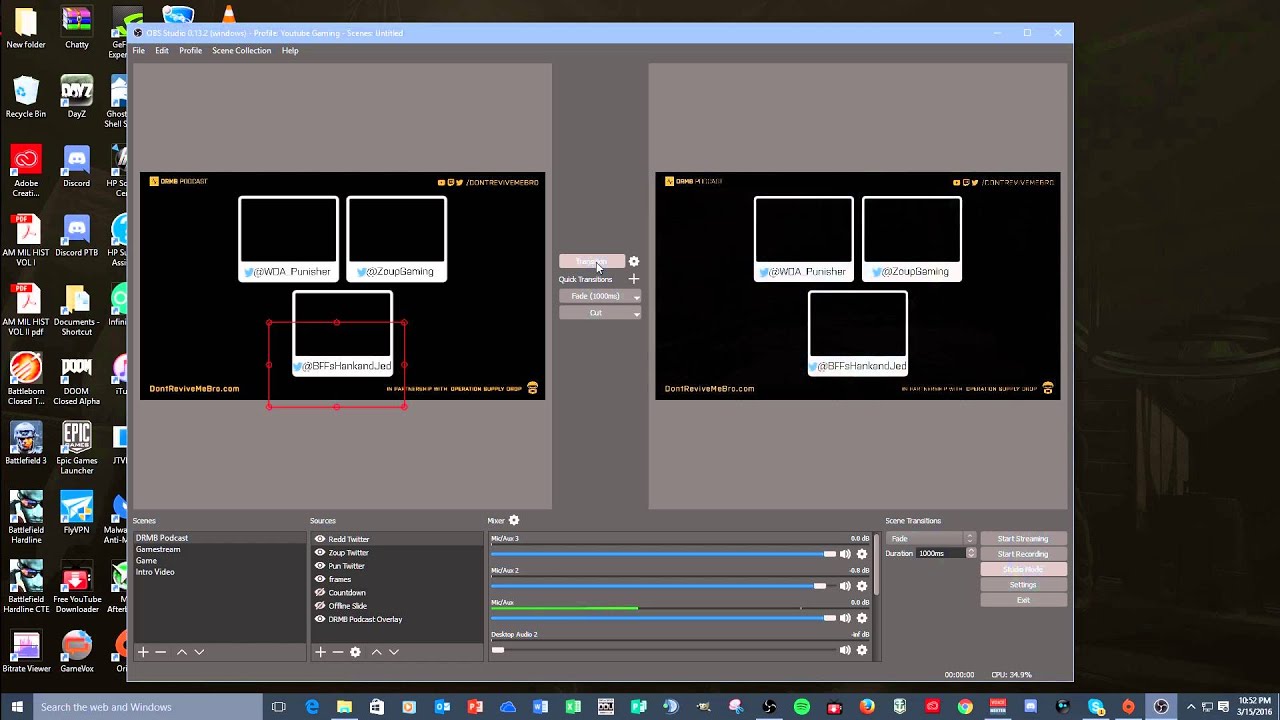
Next came the fun part: adding scenes! I created different scenes for various parts of my stream. One scene showcased my main presentation, another showed a slideshow, and another displayed a simple "break" screen. Using multiple scenes allowed for smooth transitions and a more organized broadcast. This was a game-changer compared to a single, static camera angle.
Using transitions between scenes added a professional touch to my live stream. I opted for simple fades to avoid jarring cuts. OBS Studio offers a variety of transitions; I kept it simple for my first time. Experimentation is key, but starting with simple transitions is a good strategy for beginners. The smooth transitions helped maintain the flow of the stream.
Finally, I conducted a thorough test run before going live. This involved streaming to myself or a small, trusted group to identify and fix any last-minute issues. This test run was invaluable; it allowed me to identify and resolve minor audio glitches and camera adjustments before the actual live broadcast. This prevented any embarrassing on-air technical difficulties.
Mastering the Art of Engagement on Facebook Live
Facebook Live is all about interaction. Keeping your audience engaged is key to a successful stream. I made sure to regularly check the comments section, responding to questions and acknowledging viewers. This simple act fosters a sense of community and keeps viewers invested in the stream. Responding to comments adds a personal touch.
I also incorporated interactive elements into my presentation. I asked questions, ran polls, and encouraged viewers to share their thoughts and experiences in the comments. These interactive elements kept the stream dynamic and prevented it from becoming monotonous. The engagement was much higher than I anticipated.
Using visuals, such as images and short videos, helped maintain viewer interest. Static presentations can be boring, so breaking up the monotony with different visual elements is essential. Visual aids kept the audience engaged and helped illustrate key points.
To ensure my stream remained relevant, I focused on a topic that resonated with my target audience. Understanding your audience’s interests is crucial for creating engaging content. I promoted the stream beforehand to build anticipation and encourage viewers to tune in. Pre-promotion is key to attracting a larger audience.
I also created a compelling title and description for my live stream. A catchy title and an informative description draw viewers in. This is crucial for attracting viewers and explaining the content of your stream. A well-written description is your first impression.
Post-Stream Analysis and Improvement
After the stream concluded, I reviewed the recording to identify areas for improvement. This self-critique is vital for growth. I analyzed viewer comments and feedback to understand what resonated with my audience and what could be improved. This feedback is invaluable for future streams.
I paid close attention to the technical aspects, noting any audio or video issues that needed addressing. Technical improvements are often iterative, so identifying issues early is crucial. I also analyzed the stream’s overall engagement metrics.
I examined the viewer count, average watch time, and comments to assess the stream’s success. These metrics provide valuable insights into what works and what doesn’t. This data helps refine future strategies.
Analyzing the data helped me to fine-tune my future strategies. I learned what kind of content resonated most with my audience and how to improve my presentation skills. Continuous improvement is key to success in live streaming.
Based on this analysis, I identified areas for improvement, such as refining my presentation style and incorporating more interactive elements. This iterative process of improvement is crucial for growth. These refinements will be incorporated into my next stream.
Choosing the Right Equipment for Your First Live Stream
The quality of your live stream depends heavily on your equipment. While OBS Studio is free and powerful, you’ll need a decent microphone and webcam to ensure a professional-looking broadcast. Investing in quality equipment is worth it in the long run. Don’t underestimate the impact of good audio and video.
A good microphone will capture clear, crisp audio, minimizing background noise. A USB microphone is a great starting point for beginners. Clear audio is crucial for viewer engagement.
Similarly, a good webcam will provide high-quality video, ensuring your viewers can see you clearly. Consider webcams with good low-light performance for better visuals. A well-lit face is a happy face (again!).
Consider investing in a lighting kit to improve the overall visual quality of your stream. Good lighting can dramatically improve the look of your stream. This is an often-overlooked aspect of streaming.
Lastly, a stable internet connection is essential for a smooth, uninterrupted stream. Without a stable internet connection, your stream will likely suffer from buffering and lag. A stable connection is non-negotiable.
Troubleshooting Common OBS Issues
During my first live stream, I encountered a few minor hiccups. One common issue is audio latency, where the audio is out of sync with the video. This can be frustrating for viewers. To resolve this, I adjusted the audio settings in OBS.
Another common problem is video freezing or lagging. This is usually caused by insufficient bandwidth or a weak internet connection. To fix this, I closed unnecessary applications and restarted my router.
Sometimes, scenes might not transition smoothly. This could be due to incorrect settings in the transitions section of OBS. I double-checked my settings and ensured the transitions were properly configured.
OBS can sometimes crash unexpectedly. This is usually due to software conflicts or insufficient system resources. I ensured my system met the minimum requirements for OBS and restarted my computer.
Finally, remember to regularly update OBS Studio to benefit from bug fixes and performance improvements. Keeping your software up-to-date is crucial for stability.
In conclusion, my first live stream using OBS Studio was a learning experience, a mix of excitement, anxiety, and satisfaction. With careful planning, thorough testing, and a dash of patience, I successfully navigated the technical aspects and delivered a live stream that resonated with my audience. The key takeaway is that while the technology might seem daunting at first, the rewards of connecting with your audience live are well worth the effort.
Ready to embark on your own live streaming adventure? Share your experiences and tips in the comments below! Don’t forget to like and share this article to help others learn from my journey! And for more software testing insights, visit our website: softwaretesting.biz.id


